Manage Estimates window
Use this window to manage your estimates and your estimate database. You can perform the following functions from this window:
- Create a new estimate
- Delete estimates
- Rename existing estimates
- Add or remove estimate branches
To open this window, click > Manage Estimates.
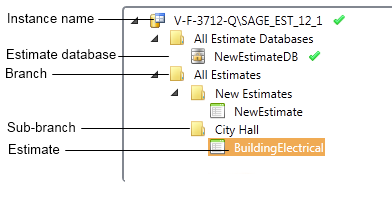
You can organize estimates by branch or sub-branch using the Estimate Catalog pane. This window displays all estimates that are currently available. Select any branch (folder icon) or estimate database in the list to display a list of all estimates within the branch or estimate database.
For more information about searching for estimates in the Manage Estimates window, see Searching for estimates.
Notes:
- You must create at least one estimate database before you can create or add estimates. See Learning about estimate databases for more information.
- You can create or remove estimate branches and add or delete estimates only if you have the appropriate SQL Server permissions level.
-
Sage Estimating locks each estimate exclusively for the user who is currently working with it. However, if you are working with an estimate and your session is unintentionally interrupted for any reason,Sage Estimating automatically unlocks the estimate. See Locking and unlocking estimates for more information.
To open any estimate in the Estimating program, double-click the estimate, or right-click it, and then click Open.
-
From the Estimate Catalog pane of the Manage Estimates window, right-click the All Estimates folder icon in the Estimate Catalog pane, and then select New > Branch or click the New Branch icon
 .
.The new branch appears with the name New Branch.
Similarly, you can select a sub-branch folder icon below the All Estimates folder icon, and then select New > Branch to create another sub-branch.
-
Right-click the new branch, and then click Rename.
-
Type the desired name for the new branch, and then press Enter.
-
In the Manage Estimates window, click the create new estimate icon in the toolbar of the Estimate Catalog pane
 .
.Alternatively, you can right-click an estimate database in the Estimate Catalog pane, and then click New Estimate.
-
In the New Estimate window, type a name for the new estimate.
Also select the SQL Server instance (server) and the estimate database where you want to store the new estimate.
-
Type the name of the branch or sub-branch in the Estimate Catalog pane where you want the estimate displayed. For example, if you want the estimate to be stored in the Electrical sub-branch of the City Hall branch, type City Hall\Electrical.
Alternatively, you can click [Browse] to locate the branch or sub-branch. To create a new branch:
- Right-click the parent folder or branch.
- Click New > Branch.
- Type the name for the new branch, and then click [OK].
- Click [Create].
- Edit the estimate cover sheet details using the Estimate Settings window and the Estimate Information window.
-
In the Estimate Catalog pane of the Manage Estimates window, click the copy estimate icon in the toolbar of the Estimate Catalog pane
 .
.Alternatively, you can right-click on the estimate you want to copy, and then select Copy from the context menu.
Note: You cannot copy an estimate if another user is currently using or editing it. See Locking and unlocking estimates for more information. Unavailable estimates are indicated in the Estimate Catalog pane by a lock image over the estimate icon.

-
Beside the Source estimate box, click the [Browse] button, and then navigate to and select the estimate you want to copy.
Note: Sage Estimating creates and stores your new estimate in the same SQL Server instance and estimate database as the original source estimate.
-
Beside the Target branch box, click the [Browse] button, and then navigate to and select the location to display your new estimate in the Estimate Catalog.
Example: If you want to display estimates by location and project name and you are creating a new estimate for the "building electrical" project at City Hall, select the City Hall branch from the list, or browse to it.
Note: The branch is displayed for organizational purposes only. All estimates are stored on the same level iin the specified estimate database.
-
In the New estimate box of the Copy Estimate window, type the name of the new estimate you want to create.
Note: If the new estimate is located on the same branch as the existing estimate, type a unique name for the estimate.
- Do you want the new estimate to use
the quantities and amounts from the estimate you are copying?
- Yes. Clear the Clear quantities and amounts check box.
- No. Select the Clear quantities and amounts check box.
- Do you want
the new estimate to use the same view and edit access as the estimate you are copying?
- Yes. Clear the Restrict view/edit access to you and administrators check box.
- No. Select the Restrict view/edit access to you and administrators check box.
-
Click [].
Sage Estimating creates the estimate and opens the Estimate Information window.
-
Complete the fields on the tabs. At a minimum, you need to complete the Project name field. The Job size field is not required, but we recommend filling it in.
To display help for a field, select the field, and then press F1.
- When you finish entering information about the estimate, click [OK].
Sage Estimating creates the estimate. Edit the estimate cover sheet details using the Estimate Settings window and the Estimate Information window.
Items on this tab
You can access these settings by selecting any estimate in the Estimate Catalog pane.
| Pane | Notes |
|---|---|
| Estimate Catalog pane |
This pane displays a "tree-view" list of estimates available for use with Sage Estimating. Estimates in this pane are organized according to "branches" and sub-branches. You can create or specify a branch at the time you create an estimate. Click the arrow key to the left of any branch name to display its sub-branches and estimates.
You can add a branch or sub-branch, remove a branch, and rename an existing branch by right-clicking on it and selecting the appropriate option from the context menu. You can also delete, rename, or copy any estimate in the pane by right-clicking on it and selecting the appropriate option from the context menu. |
| Estimate Catalog toolbar | Create new estimates or estimate databases by clicking the corresponding icon in this toolbar. You can also refresh the list in the Estimate Catalog pane by removing estimates that have already been deleted by other users. |
| Button | Notes |
|---|---|
| Notes | Displays additional estimate information such as important bid dates or reminders in the box. |
| Import file |
Click to import estimates that have been saved previously in extensible markup language (XML) format. Importing estimate data allows you to restore one or more estimates from backup. Whereas exporting estimate data locks the corresponding estimate, importing estimate data unlocks the estimate or estimates for use again. |
| Create export file |
Click to export one or more selected estimates as a compressed (zipped) extensible markup language (XML) file. Exporting estimate data allows you to store a backup copy of your estimates in XML format and import it into Sage Estimating later. |
| Estimate Catalog toolbar buttons | Create new estimates or estimate databases by clicking the corresponding icon in this toolbar. You can also refresh the list in the Estimate Catalog pane by removing estimates that have already been deleted by other users. |
| Item | Notes | |||||||||||||||
|---|---|---|---|---|---|---|---|---|---|---|---|---|---|---|---|---|
| Database name | Displays the name of the estimate database as set in the at the time of creation. | |||||||||||||||
| Phase suffix |
Displays the Sage Estimating phase code suffix. The phase suffix formats the phase code by setting aside part of that 9-character code for a suffix. The suffix determines how many digits are to the right of the decimal point.
|
|||||||||||||||
| Project name |
Displays a brief description (required, up to 100 characters) for the project. The project name appears in the title bar of the Spreadsheet window. It also appears on the heading of every page when you print an estimate report or a report cover page. |
|||||||||||||||
| Document title | The title information appearing on the estimate cover sheet. | |||||||||||||||
| Estimator |
The name (up to 30 characters) of the person responsible for this estimate. |
|||||||||||||||
| City cost index |
Displays the default cost index for this estimate. During takeoff, Sage Estimating uses this value to adjust the prices in the spreadsheet. For a new estimate, this field is blank. When no cost index has been specified, Sage Estimating uses the Base Price, (the original item prices stored in the database). |
|||||||||||||||
| Expected duration |
The amount of time (up to 8 digits) the project will take to complete. You can use the duration in formulas and as a basis for addons. |
|||||||||||||||
| Duration units |
The project's time unit of measure (up to 4 characters) that applies. |
| Item | Notes | |||||||||||||
|---|---|---|---|---|---|---|---|---|---|---|---|---|---|---|
| Hours per day |
The standard number of working hours (up to 3.2 digits; default = 8) in a day. Man hours are calculated using this number for items with a day-based order unit (Day, Man day, and—for Estimating Extended only–Crew day). This value is used to calculate the labor and equipment hours for items with certain time-based order units. The totals appear in the spreadsheet, Totals window, and reports. |
|||||||||||||
| Hours per week |
The standard number of working hours (up to 3.2 digits; default = 40) in a week. Man hours are calculated using this number for items with a week-based order unit (Week, Man week, and—for Estimating Extended only—Crew week). This value is used to calculate the labor and equipment hours for items with certain time-based order units. The totals appear in the spreadsheet, Totals window, and reports. |
|||||||||||||
| Hours per month |
The standard number of working hours (up to 3.2 digits; default = 173.33) in a month. Man hours are calculated using this number for items with a month-based order unit (Month, Man month, and—for Estimating Extended only—Crew month). This value is used to calculate the labor and equipment hours for items with certain time-based order units. The totals appear in the spreadsheet, Totals window, and reports. |
|||||||||||||
| Price crew method |
Displays the method for calculating the labor/equipment crew price for items with these generic time-based order units: Hour, Day, Week, Month.
For example, a crew consists of the following resources:
This crew could have either of the following prices based on the selected crew pricing method.
|
|||||||||||||
| Report hour type |
The method for calculating the labor and equipment hours for items with crews on reports.
|
|||||||||||||
| Labor rate table |
The name of the rate table that you want to use for labor calculations. The rate table is automatically assigned to the estimate. A rate table provides the hourly and benefit rates used to calculate the cost of the resources in crews. You can set up an unlimited number of rate tables. For instance, you might set up separate rate tables by region or to handle regular and overtime pay. You can set up rate tables in Sage Estimating (Data tab > Crews group > Crews > Rate Tables, or in classic view, Database menu > Crews > Rate Tables). |
|||||||||||||
| Equipment rate table |
Select the name of the rate table that you want to use for equipment calculations. The rate table is automatically assigned to the estimate. A rate table provides the hourly and benefit rates used to calculate the cost of the resources in crews. You can set up an unlimited number of rate tables. For instance, you might set up separate rate tables by region or to handle regular and overtime pay. You can set up rate tables in Sage Estimating (Data tab > Crews group > Crews > Rate Tables or in classic view, Database menu > Crews > Rate Tables). |
| Item | Notes |
|---|---|
| Minority business | The amount (up to 7.2 digits) of the total bid that must be subcontracted to minority-owned businesses. |
| Women owned business | The amount (up to 7.2 digits) of the total bid that must be subcontracted to women-owned businesses. |
This group displays special heading or subtitle information for an estimate report. This information appears on the cover page of an estimate report when you select the Print cover page option in Sage Estimating before printing.
For example, if you want the engineering company division and manager to appear on your report, type the division name in the Line 1 box and type the manager's name in the Line 2 box.
| Item | Notes |
|---|---|
| Project | A brief description or name for the project. |
| Job size |
Displays the job size. As soon as there are actual currency amounts in the spreadsheet, Sage Estimating calculates the cost per unit for the entire job by dividing the total cost of the estimate by the job size. The cost per unit displays in the Totals window. You can also use the job size in formulas and as a basis for addons in the Sage Estimating software. |
| Contract amount |
The amount of the contract (14 digits), if known. You can use this amount as the basis for addons in the Sage Estimating software. |
| Job units |
The unit of measure (up to 4 characters) associated with the job. You can clear your selection at any time by clicking [Clear]. Note: Clearing your selection does not clear the unit of measure from the list. |
|
Job Classification |
Displays custom fields used to store additional estimate information. The labels are saved in the database and apply to all estimates created with that database. |
| Item | Notes |
|---|---|
| Street | Displays the number and street name for the location of the project. |
| City | The name of the city for the location of the project. |
| State/Province | The name of the state or province for the location of the project. |
| Zip/postal code | The US ZIP code or international postal code for the location of the project. |
| Country | The country or region for the location of the project. |
| Item | Notes |
|---|---|
| Client company |
Displays the client company associated with the estimate. |
| Client primary contact |
Select the contact person associated with the estimate. You can click [Clear] at any time to clear your selection. People in the list are set up in the address book. Click [Edit] to open the Address Book window to edit the contact information. Note: Sage Estimating prompts you to save your estimate information before exiting. |
| Client primary contact phone number | Displays the main phone number (as set in the address book) of the contact person associated with the estimate. |
| Client mobile phone number | Displays the mobile phone number (as set in the address book) of the primary contact person associated with the estimate, if available. |
| Item | Notes |
|---|---|
| Architect company |
Displays the architecture company associated with the estimate. Companies in the list are set up in the address book. |
| Architect primary contact |
The architect associated with the estimate. People in the list are set up in the address book. Sage Estimating prompts you to save your estimate information before exiting. |
| Architect primary contact phone number | Displays the main phone number (as set in the address book) of the architect associated with the estimate. |
| Architect mobile phone number | Displays the mobile phone number (as set in the address book) of the primary architect associated with the estimate, if available. |
| Item | Notes |
|---|---|
| Engineer company |
Displays the engineering company associated with the estimate. Companies in the list are set up in the address book. |
| Engineer primary contact |
The engineer associated with the estimate. People in the list are set up in the address book. |
| Engineer primary contact phone number | Displays the main phone number (as set in the address book) of the engineer associated with the estimate. |
| Engineer mobile phone number | Displays the mobile phone number (as set in the address book) of the primary engineer associated with the estimate, if available. |
| Item | Notes |
|---|---|
| Winning bidder | Displays the name of the company that won the bid, if available. |
| Amount | The amount of the winning bid. |
| Bid date |
The date (in mm/dd/yyyy format) and time (in h:mm format) when the bid is due. |
| Other Bidders 1-4 | The company name and monetary amount of another bid on the project. |
| Winning bidder note |
Displays comments you enter about the winning bid. |