
Grouping estimates by branch level in the estimates grid
You can use branch level columns in the estimates grid to organize estimates by individual branches of the estimate tree. These columns appear after the Branch column and are named Branch level 1, Branch level 2, and so on, depending on the structure of your estimate catalog. Display these columns when you want to sort, filter, or group estimates by a specific part of the branch path rather than by the full branch path. (Use the Show/Hide window to display them.)
The available branch level values depend on the folder you select in the Estimate Catalog. If you open a saved layout that includes a branch level column that does not apply to the selected folder, the cells in that column are blank.
Note: Branch information in the grid stays the same until you refresh the grid or exit and reopen it. This helps prevent estimates from appearing to move or disappear while you are editing grid information.
Example: Suppose your Estimate Catalog is organized first by region, then by project type, and then by project phase. For example, under All Estimates, you might have a West Region branch with Commercial and Residential sub-branches. Under Commercial, you might have Preconstruction, Active Bids, and Awarded Jobs sub-branches.
If you select All Estimates and show the branch level columns, Branch level 1 would show the region, such as West Region or Central Region. Branch level 2 would show the project type, such as Commercial or Residential. Branch level 3 would show the project phase, such as Preconstruction, Active Bids, or Awarded Jobs.
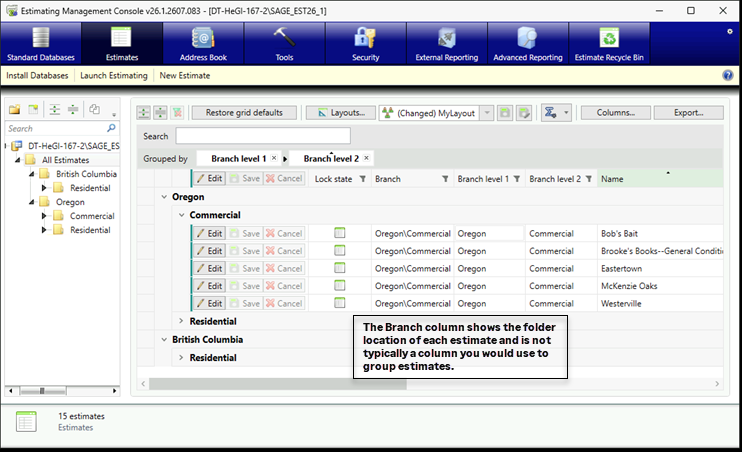
With these columns visible, you can drag the Branch level 1 column heading to the grouping area to group estimates by region on the grid. You can also drag Branch level 2 to the grouping area to group the estimates within each region by project type.
To group estimates by branch level:
-
In the Estimate Catalog in the Manage Estimates window or on the Estimates tab in the Estimating Management Console, select the branch that contains the estimates you want to display.
-
Click [] to open the Show/Hide Columns window.
-
In the Show/Hide Columns window, select the branch level columns you want to use. For example, select Branch 1 to group estimates by the first level under the selected branch, or select Branch Level 2 to group estimates by the next level.
-
Close the Show/Hide Columns window to return to the estimates grid.
-
Drag the branch level column header to the grouping area above the grid. For example, drag Branch level 1 to group estimates by region.
-
To add another level of grouping, drag another branch level column header to the grouping area. For example, drag Branch level 2 to group estimates within each region by project type.
When you group estimates by a column, the groups are collapsed by default. Use the arrow icons beside the group headings in the grid to expand the groups, and then continue to sort or filter the grid by using the controls in the column headers.
Tip: Branch level columns move together when you drag them to a different location in the grid.